Posts

Showing posts with the label #GiftIdeas

Pineapple Express!

Image
This post is related to 'how to wrap a Champagne for a gift'. As summer is around the corner, let's give a touch of "tropical thunder" while gift wrapping the champagne. Here, I have wrapped it as a pineapple. SUPPLIES: 1. Yellow Paper (for the Pineapple Body) 2. Green Paper (for the leaves) 3. Glues/ Scotch-tape 4. Markers 5. And of course, the Champagne bottle! Gifted Wrapped Champagne into Pineapple! Tropical Thunder! :) INSTRUCTIONS: Step#1: Wrap the body of the champagne bottle with a yellow paper. Step#2: Cut the green paper in a shape of leaves. Step#3: Paste the paper leaves on the neck of the bottle. Step#4: TA-DA! You have just transformed the champagne into a pineapple! Have FUN and Safe Drinking Guys!

How to organize a Bachelorette Party?

Image
It's a wedding season in Nepal, and our very closed friend  Chandu  recently got hitched. To honor her, we threw Bachelorette Party. Here's the  simple tricks and tips to organize it. 1. Photo Booth: For photo booth, we made the photo backdrops out of silver paper plates, tape it carefully so that it overlaps and get the scallop effect. 2.   Photo Props: Please see here for the photo props tutorial. The Fun Props! The Girls! 3. Dress Code: The color coordinating is a fun part for the Bachelorette Night, we made bride-to-be wear a great number in pink and rest of the girls (bridesmaids) wore black dress. Chandu's Bachelorette Night Photo booth 4. Bride-to-be Sash: Obviously to honor Bride-To-Be the sash is must. As these kind of party props are not available in Nepal, I made it out and it was pretty easy. I took the satin cloth, cut in the regular sash size and wrote "Bride-To-Be" in pink, wit...

Featured: Awesome Bookmarks!

Image
Today I am featuring Annika Baini's DIY: Bookmark. I have seen her other works and she's a truly blessed artist. I'm pretty sure, all the book-lovers like me, will instantly fall in love this post.  DIY Boomark Source: Annika Rai Pick your favorite! Source: Annika Rai To start with you will need a chart paper preferably heavy paper and trim it in regular rectangular bookmark dimension.  But, the best part of designing your own bookmark is you can customize its shape and size. Then, put your creative hat on and start decorating your bookmark! It is a very simple and easy-to-make awesome bookmarks and also a great gift idea. Thanks Annika for letting me post your DIY! :)

To The Moon!

Image
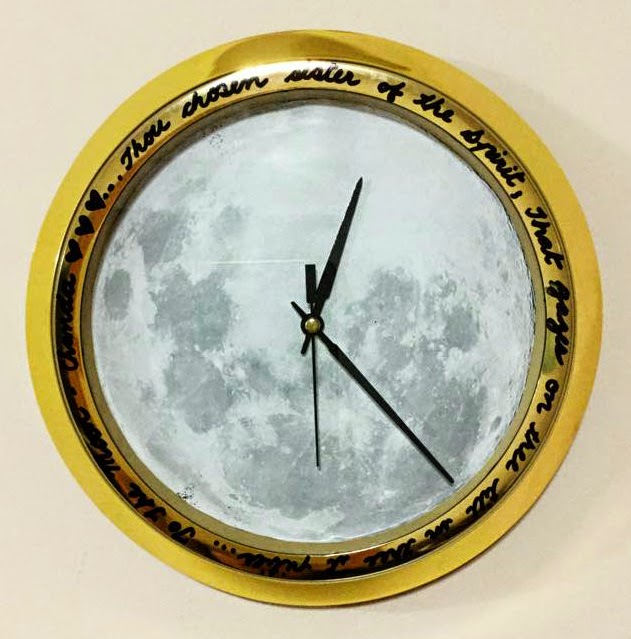
Today's DIY is a personification of a very dear friend and sister - Chanda , who recently tied a nuptial knot. The literal meaning of Chanda is " the moon ", hence I made this customized wall clock specially for her. I wrote down the last para of the poem - 'To The Moon" by Percy Bysshe Shelley on it and presented it on her Bachelorette Night! Thou chosen sister of the Spirit,       That gazes on thee till in thee it pities ... Although, 'To The Moon' is a romantic poem, yet so lonely type of poem, however I have completely different interpretation for Chanda . She is a one-of-a-kind friend and a sister who will always shine amongst  us and will be never alone or lonely! The Moon Clock We love you to the moon and back, Chandu! The Moon Clock in making! SUPPLIES: - Wall Clock  - Moon Picture/ Photo - Glue - Leatherman  - Permanent Marker INSTRUCTIONS: Step#1:  Take a wall ...

Up Birthday Theme!

Image
On my hubby's 30th Birthday, I wanted to do something very special for him, as he's going out of country a year mission and I'm gonna miss a lot of special occasions with him. For the start, I made the personalized  invite via Picmonkey  for my hubby's 30th Birthday. BTW, his nickname is Chakku.;) Chakku's 30th Birthday  I wished him HAPPY BIRTHDAY at midnight and gifted him photograph of our wedding day so that he can have our BIG DAY memory by his side, no matter how far we are from each other! I bought the Nepali kagaj photo frame from Mahaguthi who sells best handicraft items in Nepal. Gift#1: Our BIG Day Picture As my hubby is a morning person unlike me, that's why I had sneaked up at night to put the customized DIY hand wash dispenser: My Superhero "HOBBY" Happy Birthday  in the bathroom. In the morning, he was very happy to this very punny gift.   Hand wash Dispenser DIY: I designed  My Superhero ...

Making Memories!

Image
Store your beautiful memories in a box, if you say how? Then, this is how we do it -  Memories in a Box! INSTRUCTIONS: Step#1:   I started off, by selecting my best and favorite pictures which was from our last year's 'Kerala and Goa Holiday' album. Step#2 :  I stuck all the developed instagram pictures in a long strip  of white chart paper and folded it. Step#3:   When pictures were all done, I kept it inside the box ( Nepali Kagaj Box )- which I got it from Nepali handicrafts shop. This DIY is an incredible way to make a portable album which also serves as a decorative piece and for the gift ideas. I'm sure you'll love storing your most unforgettable adventure in a box... like I did!!!

Thinking Outside the Box!

Image
Rather than just throwing away the candy box, we can upcycle it for the purpose of storing jewellery or anything you want, or as the gift box. 1. Pansy Flower Box: Pansy Flower Box 2. Cherry Blossom Box: Cherry Blossom Box Step#1: I painted the box with single color with acrylic paint,          but  it would be better to use spray paint for                   the  background.         Step#2: I drew my favorite flower designs - Pansy and          Cherry Blossom(Sakura). Put on your creative hat and think outside the box to make your customized box.

DIY: Dreamcatcher Key-ring

Image
This is a perfect idea to create ' dream-catcher key-ring ' out of leftover beads  (also known as " Potey " [पोते]in Nepali ) and that extra plastic curtain rings of your home. Dreamcatcher (photo source: internet) SUPPLIES: 1. Different colors of Beads 2. Embroidery Floss 3. Plastic Curtain Ring 4. Needles I started by sewing button hole stitch around the plastic curtain ring with blue embroidery floss, then weaved dream-catcher web inside the ring with colorful beads. Finally, I embedded strings of beads  instead of feathers. Dreamcatcher Keyring made out of curtain ring FOOD FOR THOUGHT: "If you really want to catch your dream, you have to chase it!" - - - - - - - - - - - - - - -  You might also like: Neon Dreamcatcher  Braided Necklace - DIY!

I'm stoned.

Image
I had seen this picture on Pinterest and immediately thought of making one, but eventually I ended up making a parliament of owls, and I'm happy with the result. Only few items i.e. stones or rocks and acrylic paints are required to make this DIY. First, I cleaned the stone and painted it. Second, I drew owl designs, colored it and FINITO! Before and After My Parliament of Owls And this is how you get STONED!lol In a serious note, DON'T DO DRUGS! ----------------------------------------- If you liked this post, then you probably also like-> For the Forgetful Gardener! Rock on! Gee and The Chocolate Factory

For the Forgetful Gardener!

Image
I have always been a forgetful gardener because of my bad habit lots of my plants have withered away. So, the "Rocky Cactus" is the brilliant DIY "for the forgetful gardeners" like me. Rocky Cactus  To get started, you'll need;  1. Rocks  2. Green Paint (preferably Acrylic)  3. White Paint  4. Flower Pot  5. Sand Start by cleaning up the rocks Paint it green Make "spiny stems" with white color to give 'cacti look' After it dries up, place it in the flower pot and V-O-I-L-A your "Rocky Cactus" is ready to ROCK! P.S. this DIY is inspired from Pinterest. ----------------------------------------- If you liked this post, then you probably also like-> I'm stoned. Rock on! Gee and The Chocolate Factory